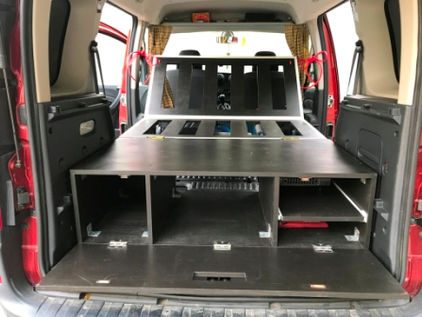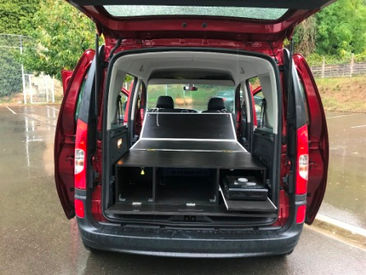

DIY - BiberBox
Camping box - build your own!
Building camping boxes yourself is becoming increasingly popular among outdoor enthusiasts – and with the DIY BiberBox, it’s a breeze! This versatile solution transforms your vehicle into a functional camper without requiring major technical skills. The guide not only provides a clear step-by-step plan but also serves as a flexible template for customizing your camping box.
Keine Zeit zum Selberbauen? Hier geht es direkt zur fertigen BiberBox Campingbox (in 5 Min. startklar).

Materials list - DIY BiberBox

High-roof station wagon
Hardware
-
3 hinges 60 x 60 mm
-
3 hinges 60 x 90 mm
-
2 lift-off hinges 80 x 60 mm
-
2 magnetic catches / furniture magnets
-
1 pair of drawer runners/partial extension 550 mm
-
100 countersunk screws 3.5 x 16 mm
-
100 universal screws 6 x 45 mm
Wood parts
(18 mm birch multiplex or beech laminated wood)
-
4 boards of 1120 x 600 mm (lid and bottom of the box, head and middle bed part)
-
4 boards of 280 x 600 mm (side panels of the box)
-
1 board 300 x 600 mm (insert)
-
1 board 1120 x 300 mm (front flap of the box)
-
8 squared timbers (spruce) 44 x 44 x 600 mm
Other / Tools
-
2 ropes of 2 m length and 6 mm diameter
-
2 rope clamps optional
-
sandpaper grit 60 and 120 (240)
-
wood glue
-
hardwood oil
-
jigsaw
-
drill
The materials list to download – you'll find it here!


minibus
Hardware
• 3 hinges 60 x 60 mm
• 3 hinges 60 x 90 mm
• 2 lift-off hinges 80 x 60 mm
• 2 magnetic snaps / furniture magnets
• 1 pair of drawer slides/partial extension 650 mm
• 100 countersunk screws 3.5 x 16 mm
• 100 universal screws 6 x 45 mm
wooden parts
(18 mm birch plywood or beech laminated timber)
• 4 panels measuring 1200 x 700 mm
(Cover and base of the box, head and middle lying section)
• 4 panels measuring 500 x 700 mm (side panels of the box)
• 1 panel 300 x 700 mm (insert)
• 1 panel 1200 x 520 mm (front flap of the box)
• 8 squared timbers (spruce) 44 x 44 x 700 mm
Other / Tools
• 2 ropes, each 2 m long and 6 mm in diameter
• 2 rope clamps (optional)
• Sandpaper grit 60 and 120 (240)
• Wood glue
• Hardwood oil
• Jigsaw
• Drill

Assembly instructions - DIY BiberBox
Step by step to your own camping box
Preparation of the side panels
-
Two of the four side panels are cut with a jigsaw, centered on the long side and approximately 5 cm from the top edge, with an oval recess measuring 20 cm wide x 5 cm high. These will later serve as handle recesses.
-
A drawer slide rail is attached to each side panel with a cutout and to each side panel without a cutout, centered on the short end face (15cm) of the side panel.
-
Next, the square timbers are screwed flush to the long ends of all side panels using three universal screws each. On side panels with a rail, the square timbers must be attached on the same side.

Assembling the box
-
The side panels with the cutout are screwed flush to the short ends of the box base using three universal screws each. The wooden supports should be oriented towards the center of the box.
-
The side panel without a cutout but with a rail is screwed to the bottom of the box at a distance of 30.5 cm (measured between the two inner sides of the side panels facing each other) compared to the side panel with a cutout and rail.
-
The last side panel is screwed to the bottom of the box at a distance of 26 cm from the side panel with the recess and without a rail. The wooden beams should be positioned opposite each other.
-
The box lid is placed flush against the exposed wooden supports of the side panels and screwed to them. Please ensure that the side panels are vertical.
-
The front flap and the box bottom are connected with the 3 hinges (dimensions 60mm x 60mm) on the side where the rails are inserted.
-
The box is divided into 3 sections. The magnetic catch is attached to the underside of the box lid, centered in the left and right sections of the box.
-
The two metal counter plates of the magnetic catches are attached to the upper edge of the front flap in such a way that contact with the magnetic catch is made when closing.
-
The counterpart pieces (runners) for the rails are screwed to the long sides of the shelf. The shelf can then be hung in the rails.

Constructing a lying surface
-
Using a jigsaw, cut five evenly spaced recesses in the shape of rounded rectangles (measuring 10 cm wide x 40 cm high) into the panel for both the middle and top sections. The two outermost rectangular recesses are 11 cm from the short edge of the panel. All other recesses are spaced 10 cm apart. These cutouts can later be used as feet for the box.
-
Using a drill and a 10 mm wood drill bit, drill two sets of two holes for the ropes in the headboard. The holes must be 5 cm or 7 cm from the edge of one of the long end faces and 5 cm from the right and left short end faces.
-
The two lifting hinges are attached symmetrically to one of the long end faces of the central reclining section.
-
On the opposite long end face of the middle section, 3 hinges (dimensions 60mm x 90mm) are attached to the back of the panel so that the hinge pin is approximately 1cm away from the edge of the panel.
-
The three hinges on the center section of the bed are connected to the headboard. Here too, the distance between the hinge pin and the edge of the headboard should be 1 cm. Important: The two sets of two holes must be on the opposite side of the hinges.
-
The counterpart to the lifting hinges on the center section must be screwed onto the box lid at the same distance. Ideally, the counterpart should be hooked onto the center section before screwing it in place, thus aligning the sleeping surface with the box.
-
The two 2m ropes are threaded through the two drill holes on the left and right of the headboard. Each rope is then formed into a loop using the rope clamps.


